MV-MIPI-IMX296M 修改参数,保存重启后参数未改变
-
@wackyrabbits 好的,大约需要一两天时间。
-
@veye_xumm 问题已修正。
https://github.com/veyeimaging/mvcam_raspberrypi
请更新工具代码并测试。
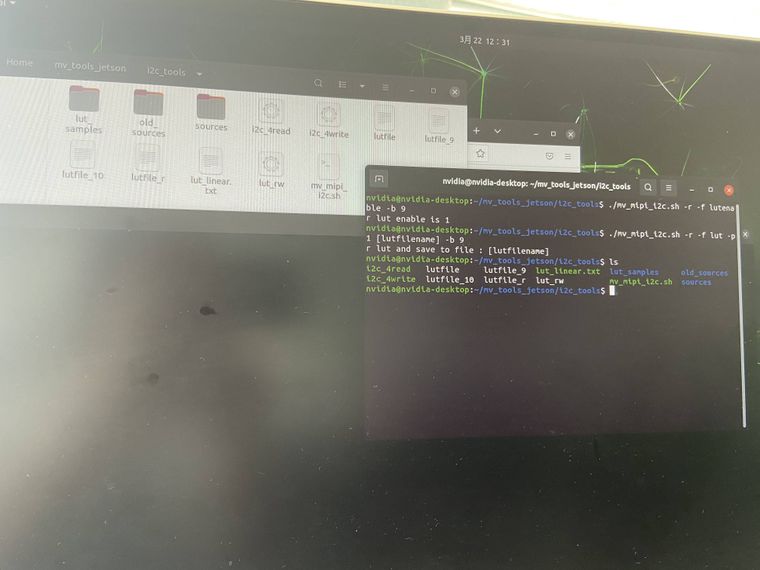
比如:./mv_mipi_i2c.sh -w -f lutenable -p1 1 ./mv_mipi_i2c.sh -w -f lut -p1 ./lut_samples/lut_gamma0.8_10bitdepth.txt -
-
@wackyrabbits 命令搞错了,区分一下lut和lutenable。
-
@veye_xumm
十分抱歉,犯了一个低级的错误,修改后仍存在以下问题- 更改参数后,画面显示仍为黑色,修改lut的参数后,预览画面无法显示修改后的效果
2.参数设置成功,重启后,lutenable参数设置成功,读取lut的参数并保存在[lutfilename]中,查找文件,未找到保存的[lutfilename]文件,且预览画面仍显示为黑色

-
@wackyrabbits
你用的是jetson平台,但是刚才工具目录我给你的是树莓派的链接。搞错了。
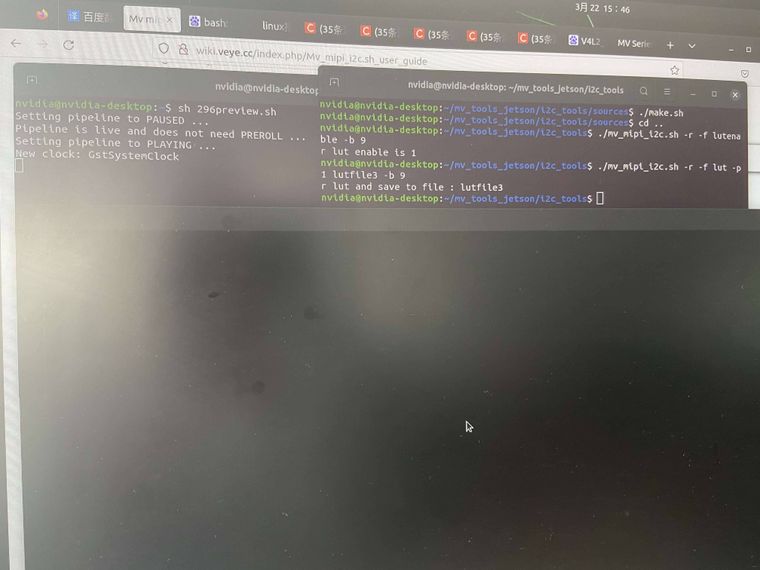
到sources目录,执行一下
./make.sh
然后再执行。
BTW:
[lutfilename] 的意思是一个变量,你可以替换成你想要的文件名。 -
@veye_xumm
【操作步骤】-
在sources执行chmod 777 make.sh 命令后返回到i2c_tools目录
-
修改lutenable及lut的参数,设置成功
-
重启后,查看画面预览模式,图像显示黑色,参数及lut与修改后的参数保持一致
【问题】
-
修改参数成功,画面并未看出有明显的变化,设备重启后,查看预览画面显示黑色该如何解决?
-
修改lutenable及lut的参数前,都要执行一下chmod 777 make.sh 的命令吗?
-
lut文件的参数是如何修改的呢,可否给出几组8bitdepth(Mono8)的文件或您这边告知一下如何修改?
-
-
你有没有执行./make.sh脚本?这个就是从源码编译得到可执行文件的文件。用文本文档打开看一眼就知道了。
黑屏是因为你的lut写操作一直没有成功过。296的AD是10bit的,用我们现在提供的10bit的几种sample即可。
-
@veye_xumm
执行了./make.sh脚本,未生成可执行文件
按照您的说法,再次进行了操作。重启后,查看参数设置成功,预览画面仍是黑屏
操作如下:
【操作】- 将目录./mv_tools_jetson/i2c_tools下的sources及lut_rw文件替换为github路径中的文件
- 在路径./mv_tools_jetson/i2c_tools/sources下执行./make.sh
- 在路径./mv_tools_jetson/i2c_tools下执行
./mv_mipi_i2c.sh -w -f lutenable -p1 1
./mv_mipi_i2c.sh -w -f lut -p1 ./lut_samples/lut_gamma1.2_10bitdepth.txt
画面显示变化,并保存参数 - 重启机器,查看lutenable及lut文件,修改成功
- 打开预览窗口,画面黑色显示
-
- 执行了就生成了,在i2c_tools目录。你认真看看。
- 上午给你的github目录是树莓派平台的,不要用那个目录中的lut_rw文件,两个平台的可执行文件不兼容的。 明白不?
建议你的步骤
- 删掉你现在的lut_rw
- 执行./make.sh,会生成一个lut_rw的。
然后再执行测试。
-
@veye_xumm
预览画面确实是黑色的。按照您的建议操作,删除lut_rw
写入lutenable及lut的数据,重启后,读取的数据也是修改后的,但是预览画面确实是黑色的。
难道树莓派平台github目录的sources无法直接与jetson平台中的sources直接替换?
1)黑屏若是因为lut写操作一直没有成功过,那为何重启后我读取的lut文件中的数值与我写入的数值是一样的呢?另外我发现存在以下问题
- 在没有开启预览画面的情况下,去修改lut文件,在打开预览模式,虽然显示是更新成功的,但是画面显示是黑色的,再次执行修改lut的命令,画面显示才不是黑色的
-
@wackyrabbits
忘掉以前的种种吧。
请按照如下步骤,在jetson xavier nx上,一步一步操作:
一、视频预览export WIDTH=1440 export HEIGHT=1088 export FPS=60 v4l2-ctl -d /dev/video0 --set-fmt-video=width=$WIDTH,height=$HEIGHT,pixelformat=UYVY v4l2-ctl -d /dev/video0 --set-ctrl frame_rate=$FPS gst-launch-1.0 v4l2src device=/dev/video0 ! "video/x-raw,format=(string)UYVY, width=(int)$WIDTH, height=(int)$HEIGHT, framerate=(fraction)$FPS/1" ! nvvidconv ! "video/x-raw(memory:NVMM),format=(string)I420" ! nv3dsink sync=false二、调试lut
- 从这个github上下载最新的mv_tools_jetson
git clone https://github.com/veyeimaging/nvidia_jetson_veye_bsp.git如果由于某种原因下载不了,换个下载方式。
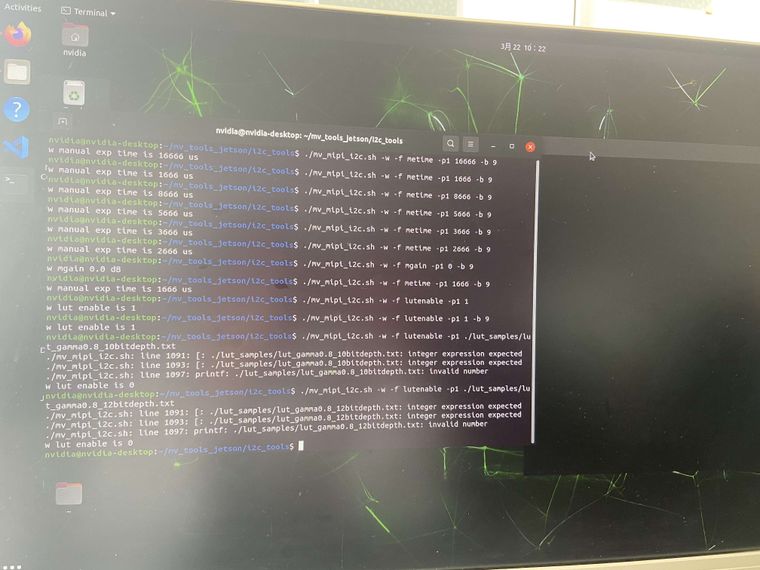
2. 修改lut。cd mv_tools_jetson/i2c_tools/$ ./mv_mipi_i2c.sh -w -f lut -p1 ./lut_samples/lut_gamma1.2_10bitdepth.txt -b 9 w lut from file : ./lut_samples/lut_gamma1.2_10bitdepth.txt successs- 在lut使能和不使能状态切换。
./mv_mipi_i2c.sh -w -f lutenable -p1 1 -b 9./mv_mipi_i2c.sh -w -f lutenable -p1 0 -b 9此时可以看到图像明显的变化。
4. lut使能时,更换lut./mv_mipi_i2c.sh -w -f lutenable -p1 1 -b 9$ ./mv_mipi_i2c.sh -w -f lut -p1 ./lut_samples/lut_gamma1.2_10bitdepth.txt -b 9 w lut from file : ./lut_samples/lut_gamma1.2_10bitdepth.txt successs$ ./mv_mipi_i2c.sh -w -f lut -p1 ./lut_samples/lut_gamma0.8_10bitdepth.txt -b 9 w lut from file : ./lut_samples/lut_gamma0.8_10bitdepth.txt successs- 读出lut曲线
./mv_mipi_i2c.sh -r -f lut -p1 ./readout_lut.txt -b 9可以对比读出的./readout_lut.txt和上次写入的lut_gamma0.8_10bitdepth.txt文件一致。
6. 参数保存功能./mv_mipi_i2c.sh -w -f paramsave -b 9然后拔下电源重新上电。
上电后读取lutenable和lut曲线:$ ./mv_mipi_i2c.sh -r -f lut -p1 new_lut.txt -b 9 r lut and save to file : new_lut.txt xumm@ubuntu:/dbg/mv_tools_jetson/i2c_tools$ ./mv_mipi_i2c.sh -r -f lutenable -b 9 r lut enable is 1可以看到enable参数保存了,而且对比new_lut.txt 和./readout_lut.txt 完全一致。
-
@veye_xumm
现在仍有问题
下载最新的mv_tools_jetson,并执行上述指令,关机重启后,数据虽然保存,但是预览模式画面仍是黑色的,需要再次执行 ./mv_mipi_i2c.sh -w -f lut -p1 ./lut_samples/lut_gamma0.8_10bitdepth.txt -b 9 命令,画面才会显示出来。麻烦您这边复现一下问题,不知道您这边是否查看了预览画面的效果显示,可否给出一个最优的解决方案。十分感谢。 -
@wackyrabbits
断电不能生效是个bug,我们已经做了升级包来解决此问题,MV-MIPI-IMX296M_C1.28_L1.33_upgrade_20230328.bin。
请参考这个文章下载升级包,升级。
http://wiki.veye.cc/index.php/Mvcam_firmware_update_manual -
@veye_xumm
请问jeston平台的升级工具是不是mv_tools_jeston中的veye_upgrade? -
-
@veye_xumm
Step 2
Using v4l2 driver mode, the power up and probe process will be performed during the linux boot process.请问针对上述语句,我需要在jeston平台如何操作?
-
@wackyrabbits said in MV-MIPI-IMX296M 修改参数,保存重启后参数未改变:
Using v4l2 driver mode, the power up and probe process will be performed during the linux boot process.
板子上电即可。
-
@veye_xumm
十分感谢,问题已经完美解决! -
@wackyrabbits 不客气。
Hello! It looks like you're interested in this conversation, but you don't have an account yet.
Getting fed up of having to scroll through the same posts each visit? When you register for an account, you'll always come back to exactly where you were before, and choose to be notified of new replies (either via email, or push notification). You'll also be able to save bookmarks and upvote posts to show your appreciation to other community members.
With your input, this post could be even better 💗
Register Login